Depth of Field – a term that describes how much of the scene in front of and behind your subject appears sharp and in focus. Achieving the desired depth of field can be challenging for many photographers, but understanding its principles is essential for creating compelling images.
The Basics
Regardless of the aperture setting, there is only one precise plane of focus in a photograph. The lens focuses on a single, thin plane, while everything in front of and behind this plane may appear in focus to varying degrees. The extent to which the foreground and background are perceived as sharp is referred to as the depth of field.
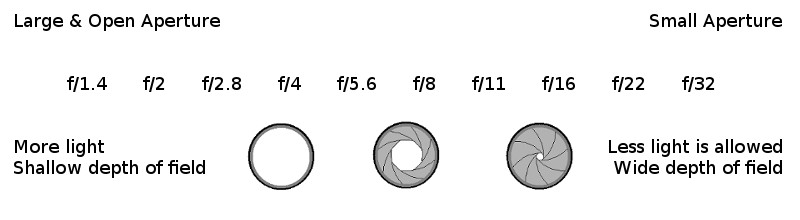
The aperture plays a crucial role in determining the depth of field. A smaller aperture (higher f-number) narrows the light path, resulting in a greater portion of the scene appearing in focus. Conversely, a larger aperture (lower f-number) allows more light to enter, leading to a shallower depth of field where the foreground and background become increasingly blurred.
Shallow Depth of Field – When only the plane of focus is sharp and just a very things in front or back are reasonably sharp. The background that is blurred is sometimes called ‘Bokeh’.
Deep (Wide) Depth of Field – This expression is rarely used. It is opposite of shallow Depth of Field. Here, most of the things in front and back of the plane of focus appear to be reasonably sharp.

(A photograph of a russet sparrow in spring time. Due to shallow depth of field, the background appears out of focus.)
Some other Factors
Focal Length of the Lens – A wide-angle lens typically provides a greater depth of field, meaning more of the foreground and background will appear reasonably sharp. In contrast, as the focal length of a lens increases, the depth of field becomes shallower. This is why photographs of distant subjects, such as birds or wildlife, often feature blurred backgrounds—longer focal lengths narrow the depth of field, creating a pronounced separation between the subject and the background.
Location of Focus Plane– The closer the focus plane is to the lens, the shallower the depth of field becomes. This is particularly important in macro photography. For instance, when photographing a small insect up close, even a small aperture like f/16 may not be sufficient to achieve full focus across the entire subject. In contrast, the same aperture can easily keep an entire street scene in focus due to the greater depth of field at longer distances.
Sensor Size – Sensor size itself does not directly affect depth of field. However, due to the interplay between focus distance, the position of the photographer and subject, and the lenses used, smaller sensors often produce a greater (deeper) depth of field. This effect occurs because, to achieve the same field of view, a smaller sensor requires a shorter focal length lens, which inherently increases the depth of field compared to a larger sensor using a longer focal length lens.
Hyperfocal Focusing
An intriguing aspect of photography is that as you focus on a subject and close the aperture (using a larger f-number), the depth of field increases. Typically, the plane of focus will fall approximately one-third of the way into the scene from the foreground and two-thirds of the way from the background, creating a balance between sharpness in the foreground and background.
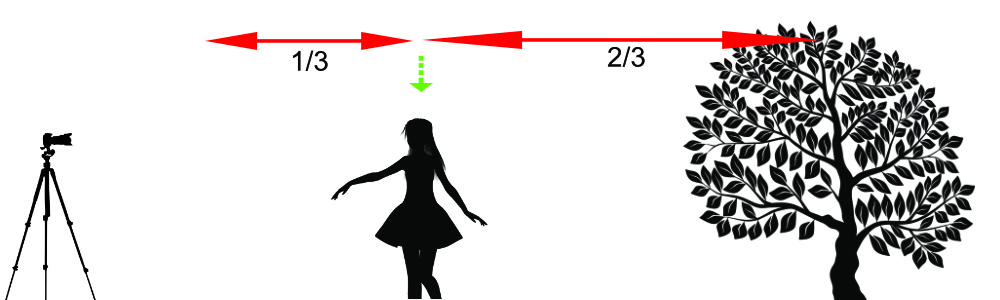
(Here the girl is in the focus plane – indicated by green arrow. The area in reasonable sharpness can be divided into two parts, 1/3rd in front and 2/3rd behind the plane of focus. This is the hyperfocal distance.)
Hyperfocal distance focusing is what is used to get foreground and background in reasonable sharpness for an aperture.
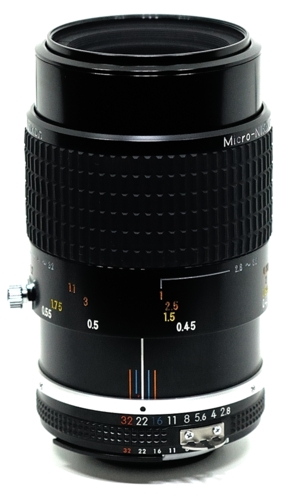
Older lenses often featured a depth of field chart etched onto their barrel to help photographers gauge how much of the foreground and background would be in focus at various aperture settings.
On my favorite macro lens, there are etched lines on the barrel that correspond to different apertures. The orange lines indicate the depth of field for f/32, with the f/32 value also etched in orange. At this aperture, the area between the two orange lines on the focusing ring will appear in focus. Similarly, the blue lines correspond to f/16, with the f/16 value etched and colored in blue.
Today, photographers often preview their images after capturing them to make any necessary adjustments.
In addition to focus tracking, I recommend using hyperfocal distance focusing when photographing fast-moving subjects, such as running children or birds in flight. This technique helps maximize the depth of field and ensures that both the subject and its surroundings are in sharp focus.
Focus Stacking
This is the new entrant to achieving deep depth of field. Sometimes even with really small apertures, it is difficult to get both foreground and background in reasonable focus.
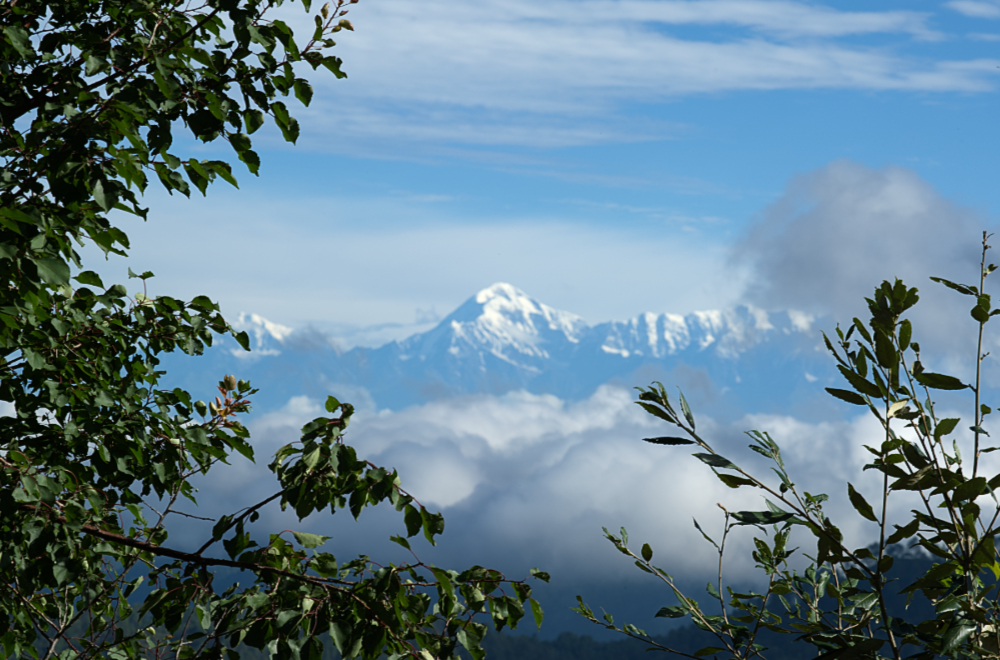
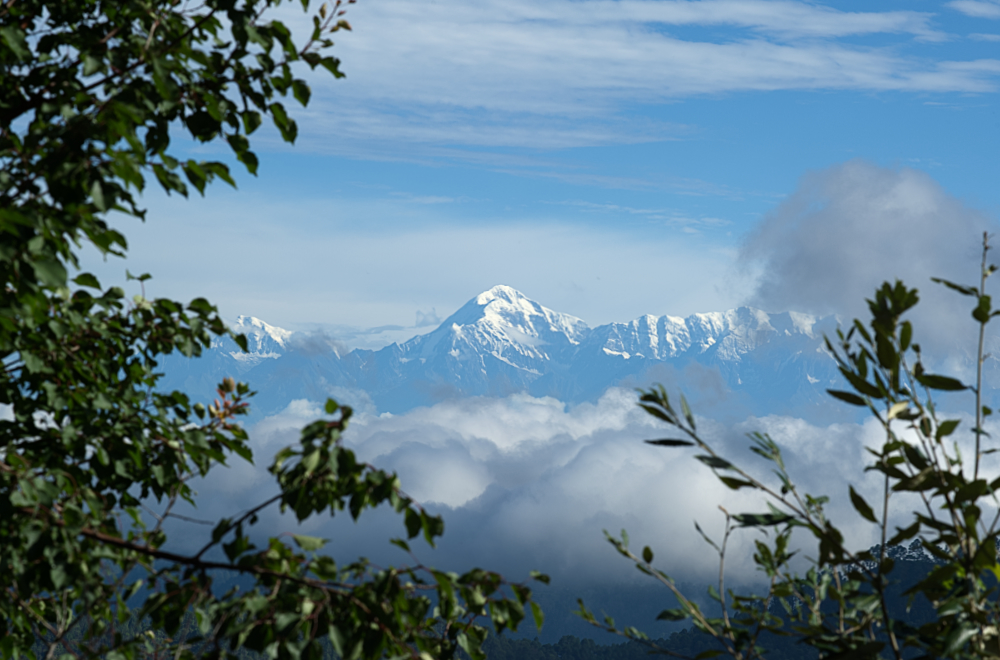
Both of the photographs were taken at f/16 using my beloved 135mm lens. Despite being a short-telephoto lens, the f/16 aperture was insufficient for achieving the desired depth of field. I attempted to focus on the clouds just behind the tree leaves. Although hyperfocal distance (one-third from the clouds to the trees and two-thirds from the clouds to the peak) should have worked, the aperture was not small enough. Consequently, the photograph ended up with the clouds in focus but the peak and leaves blurred.
The solution? Focus stacking!
Focus stacking is particularly useful in macro and tabletop photography, where the depth of field is very shallow due to the close distance of the subject. Even with the smallest apertures, it’s challenging to keep the entire subject in focus. In such cases, focus stacking provides an effective solution by combining multiple images taken at different focus points into one sharp, detailed photograph.

(Trishul Peak – Photographed using Nikon Df and Zeiss 135mm lens. 1/200 second, f/16 at ISO 100. Made by stacking two images clicked with these settings)
Affinity Photo
(Disclaimer – I have received funds from Affinity Photo)
I used Affinity Photo to create the above image. The program aligned the images properly, removed all the ghosts and produced a nice image with both the snow-peaks and leaves in focus.
Steps to create a focus stack on Affinity Photo –
- Click on File and then Click on ‘New Focus Merge’
- Add the raw files that you want to use (I always recommend using raw format)
- Click OK once the images have been added.
- Let the program do its magic.
For good results, I recommend using a tripod and changing only focus between the images. The subsequent images should be captured immediately one after another to avoid changes in lights and overall composition. Capture multiple images with minor changes for good results.
This article, originally published on my photography site, is now archived here; while some details may have lost their original context over time, it still offers an intriguing read.
Complete list of archived content – Photography Articles
Discover more from Maini's Hill Cottages
Subscribe to get the latest posts sent to your email.

Thank you Shivam Ji for this article which clears me all about the hyper focal distance and focus stacking.
LikeLike